PhotoGenerAI

Same photo. A different light.

AI Photo Relight

Change the lighting in your photo. Try soft window light, a clean studio setup or a cinematic glow, then adjust the instructions for your own image.

Try it free without an account. Sign in for up to 10 free credits per week.

Source photo

Or try a sample photo

Starting points
Your relit photo
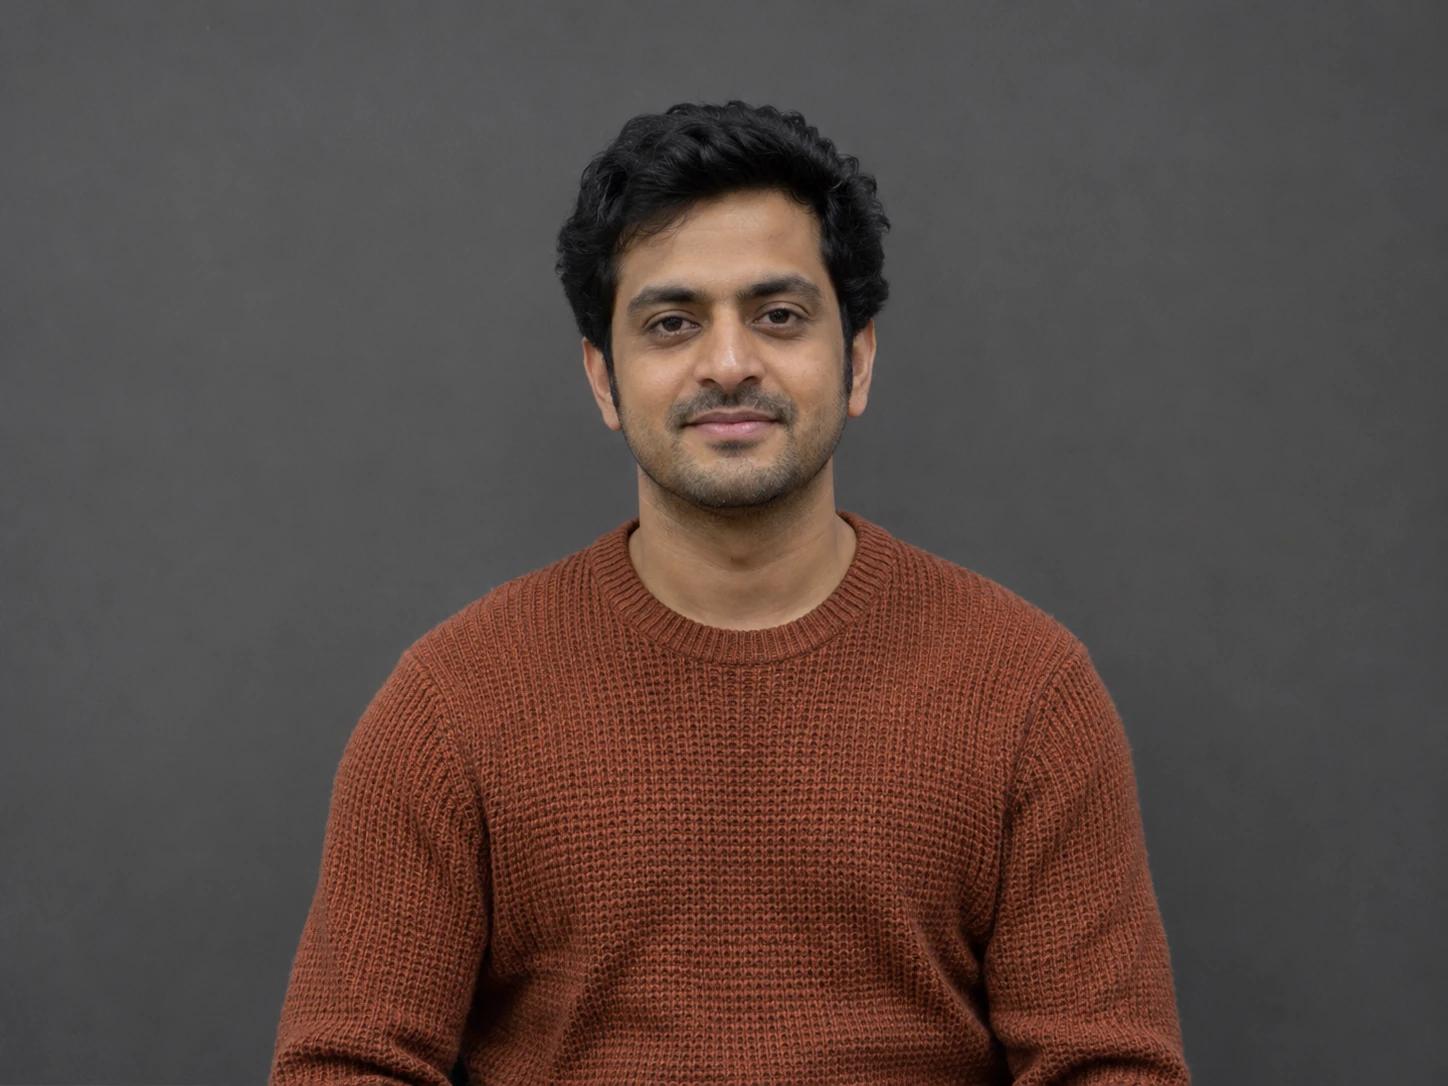
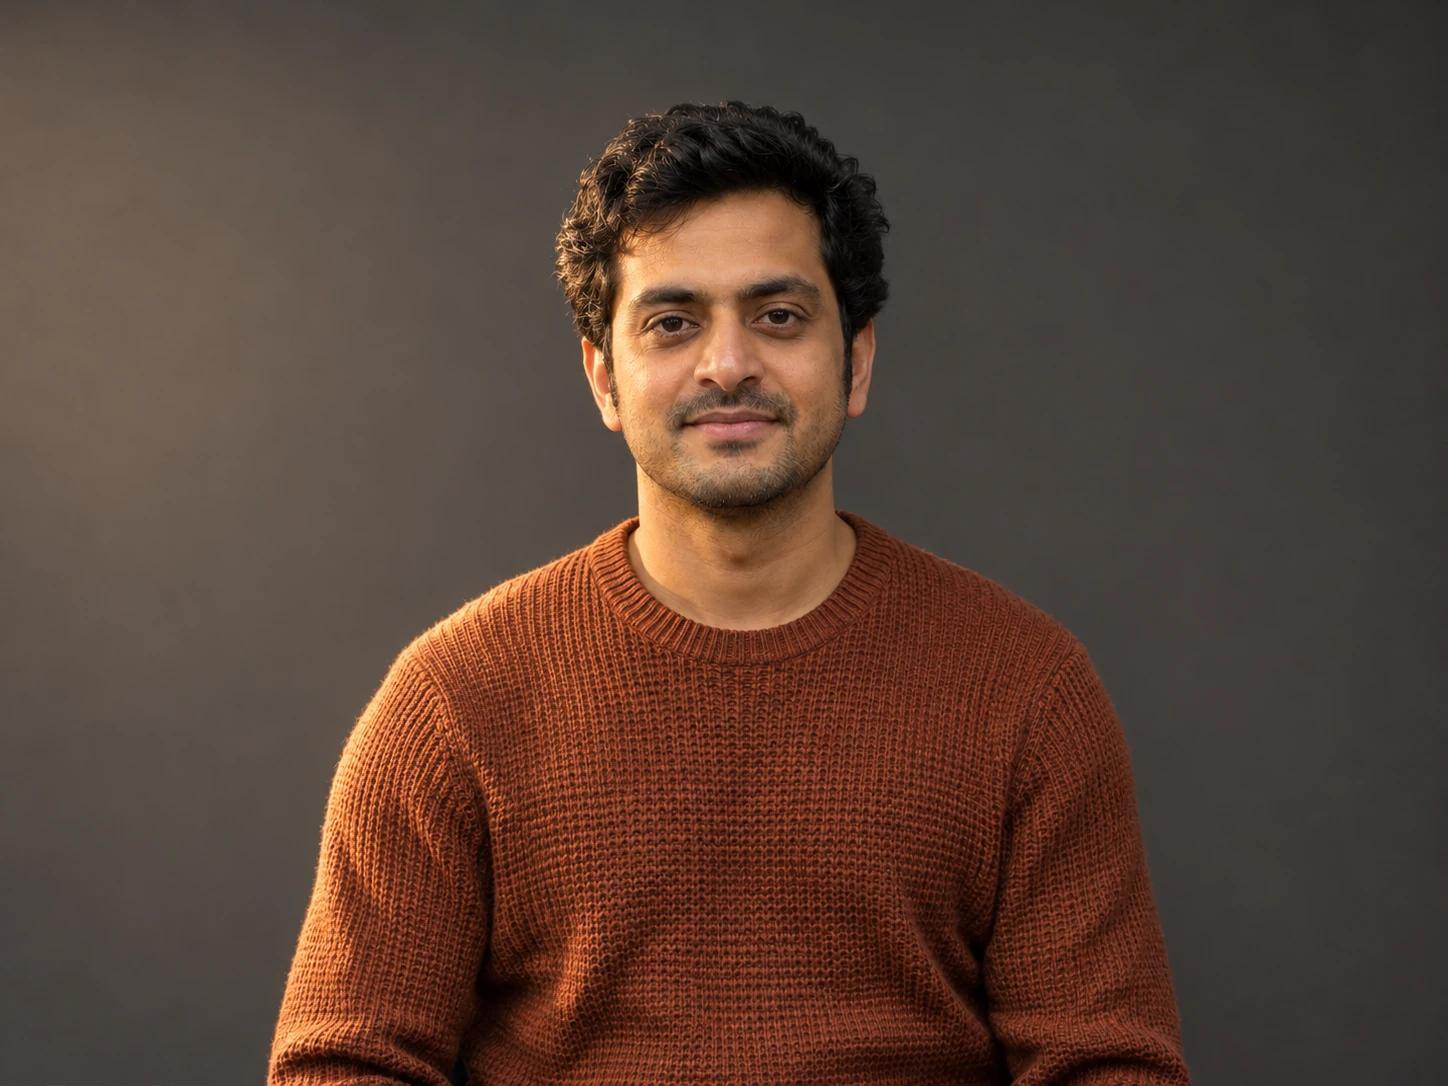
A man in a rust knit sweater under flat overhead lightThe same man with warm window light from the left and soft facial shadows
Original photoSoft window light

One portrait, two ways to relight it

Compare the light on the face, the texture of the sweater and the shadow on the backdrop. Both treatments begin with the same original photo. Use a prompt below to try that lighting direction with your own image.

A man in a rust knit sweater under flat overhead lightThe same man with warm window light from the left and soft facial shadows
Original photoSoft window light

Soft window light

A broad light source can give a flat portrait more shape without making it harsh. Here the warm light reaches the cheek and knit fabric from one side, while the other side stays readable. For your own photo, name the side of the image and ask for gentle shadows. Keep the background and clothing in the instructions so the change stays focused on the light.

Prompt for this photo

Relight the uploaded photo. Keep the subject's recognizable features, expression, hair, clothing, pose, framing and background. Preserve natural skin and material texture. Use soft warm window light from the viewer's left at about 45 degrees. Give the opposite side of the face a gentle open shadow and keep both eyes readable. Use warm-neutral color and realistic light falloff. Change only the lighting and its natural shadows. No extra people, objects, lettering or beauty retouching.
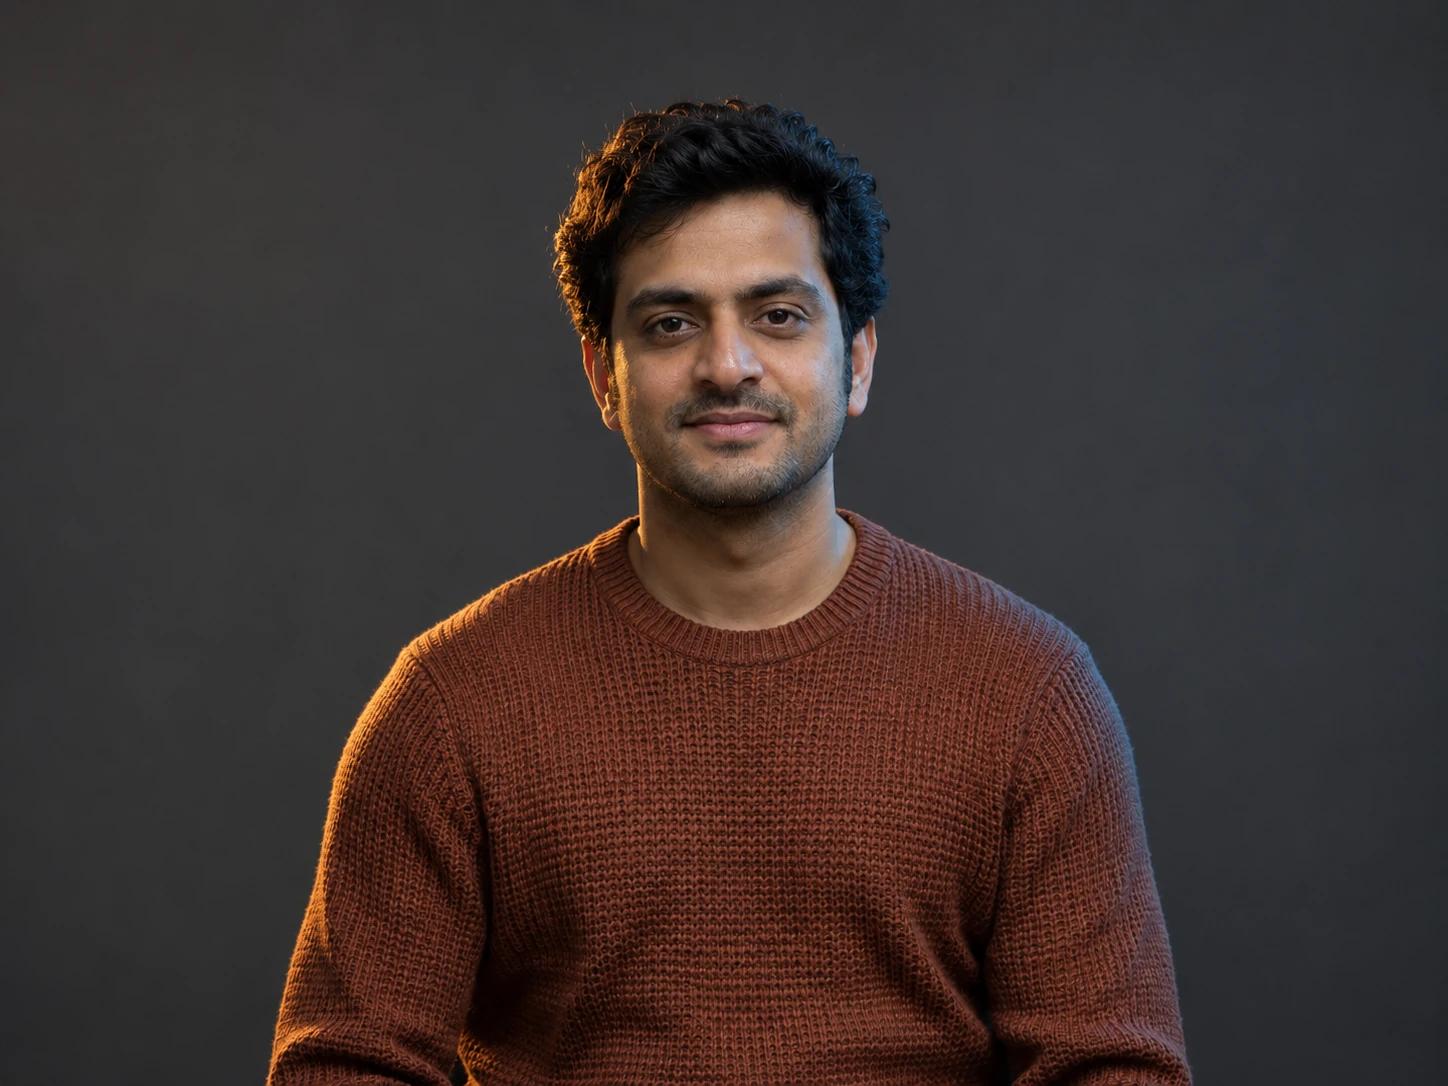
A man in a rust knit sweater under flat overhead lightThe same portrait with cool blue light and an amber edge around the hair and shoulder
Original photoCool light with a warm rim

Cool light with a warm rim

Two colors can separate a subject from a dark setting. The cool key light shapes the portrait and the amber edge catches the hair and shoulder. Keep the color restrained if you still want a believable photograph. Ask for readable eyes and natural skin texture, then compare the nose, jaw and hairline with your original before keeping the relit image.

Prompt for this photo

Relight the uploaded photo. Keep the subject's recognizable features, expression, hair, clothing, pose, framing and background. Preserve natural skin and material texture. Use a restrained cool blue key light from the viewer's right and a narrow warm amber rim on the left edge of the hair and shoulder. Keep the face readable with deep but detailed shadows and believable studio light. Change only the lighting and its natural shadows. No extra people, objects, lettering or beauty retouching.

How to use AI Photo Relight

  1. 01

    Upload a clear photo

    Add a portrait, product or other photo where the details you want to keep are visible. You can also start with the sample image. A sharp original gives the relighting request a clearer subject than a heavily compressed screenshot or a photo with completely black shadows.

  2. 02

    Describe the light

    Choose Window light, Soft studio, Cinematic or Product side light. Edit the lighting instructions to name the direction, warmth and shadow strength you want. Open Image settings to choose the model and photo shape. Keep Auto when you want the original framing.

  3. 03

    Generate, compare and download

    Check the credit cost, then choose Relight my photo. Inspect the new light, face, background and fine details at full size. Download the version you like. Continue editing uses the result as your next source; upload the original again when you want an independent lighting treatment.

What does AI photo relighting change?

Photo relighting changes how illumination appears to fall across a subject. A good request describes where the light comes from, how large or soft it feels and what kind of shadow it creates. That gives the AI photo editor a more useful brief than asking it to make an image look better. Start with one main light, then add a rim or fill only if the photo needs it.

If the whole photo only needs to become brighter, a conventional exposure adjustment may be enough. Use AI relight when you want a different lighting direction, softer facial shadows or a new lighting mood. PhotoGenerAI generates a new image from your photo and instructions. The presets fill the prompt; they do not move a physical lamp or offer a real-time 3D lighting control.

Write a lighting brief you can judge

Choose a direction first. Viewer’s left and viewer’s right are clearer than a person's left when describing a portrait. Add a height, such as slightly above eye level, when that matters. Then describe soft window light, a broad studio softbox or a narrow rim. Finish with what should remain: the expression, clothing, camera angle and original setting.

Change one part of the lighting brief at a time. If a photo is too warm, ask for neutral light before changing its direction as well. If one cheek disappears into shadow, request a little fill on that side. Working from the same original photo makes it easier to decide whether the next relight improved the image or simply gave you a different face and scene.

Relight portraits without losing the person

Start with a portrait where the eyes, hairline and facial features are already visible. Ask the AI to keep natural skin texture and the existing expression. Use broad, soft light for a profile photo or a casual portrait. A stronger side light can work for a dramatic picture, but check whether the face still looks like the person in your source photo.

Look at the result at full size before using it. Compare eye shape, facial hair, skin marks and the edge of the jaw with the original. Relighting can redraw details even when your prompt asks to preserve them. If identity has drifted, return to the source and simplify the request. For a new outfit, pose or location, the separate AI photoshoot tool offers a more suitable starting point.

Use light to describe a product

For a product photo, name the material you want the light to reveal. Soft side light can bring out a knitted texture or the curve of a ceramic surface. A broader reflection can make glossy packaging easier to read. Keep the camera angle and background steady when the purpose is to compare different lighting treatments of the same item.

Inspect labels, seams, surface color and reflections against the source. A brighter product image can still contain an inaccurate detail. Keep the original file available and choose a restrained relight for a listing. If the actual goal is a white backdrop or a lifestyle scene, use the background changer and its product prompts to plan that separate change.

AI Photo Relight questions

Read the Privacy Policy for photo processing and storage details.

Keep working on your photo

AI photo editor

Remove a distraction or describe another focused change after you have chosen the light.

Change the background

Choose a new setting or a clean product backdrop when lighting alone is not the task.

AI photoshoot

Use your portrait to explore another pose, outfit or photographic scene.

A portrait under flat overhead lightBefore
The portrait in warm window lightAfter

After the light

Keep creating with your photo

Take your next idea to the AI photo generator to try another scene, edit a detail or create a photo from a written idea.

Try your own photo

Give a good photo better light

Relight a photo with AI. Upload your image, choose soft window light, studio lighting or a cinematic look, then generate and download the new version.

Relight my photo